PSoC5LP Lab 05: Thermometer
Objective
- Implement temperature sensing using an analog sensor.
- Display real-time temperature readings on an LCD interface.
Overview
A thermistor is a thermal resistor, meaning its resistance changes with temperature. While all resistors exhibit some change in resistance with temperature, the variation is usually minimal and difficult to measure. Thermistors, however, are specifically designed to show significant resistance changes with temperature, sometimes by 100 ohms or more per degree, making them highly sensitive to temperature variations.
Thermistors are categorized into two types: NTC (Negative Temperature Coefficient) and PTC (Positive Temperature Coefficient).
- NTC Thermistors: In NTC thermistors, the resistance decreases as the temperature increases. This characteristic makes them ideal for temperature measurement and control applications. NTC thermistors are commonly used in devices such as digital thermometers, HVAC systems, and automotive temperature sensors.
- PTC Thermistors: In PTC thermistors, the resistance increases as the temperature rises. These thermistors are often used in applications where overcurrent protection is needed. PTC thermistors act as resettable fuses; as the current increases, the thermistor heats up, causing the resistance to increase, which limits the current flow. This makes them helpful in protecting circuits from overheating, such as power supplies, battery charging systems, and motor protection circuits.
In summary, NTC thermistors are primarily used for accurate temperature measurement, while PTC thermistors are often employed for circuit protection due to their self-regulating current-limiting properties.
Required Reading Materials
- Lesson KB 06: Interfacing Character LCD Display Module with PSoC
- MF52D-103f-3950 NTC Thermistor
- PSoC Creator Component Datasheets:
Required Components
 |
MF52D-103f-3950 NTC Thermistor | × 1 |
| 10 KΩ | × 1 | |
| Character LCD Module | × 1 | |
| 10 KΩ Potentiometer | × 1 |
Circuit / Schematic

Procedure
Creating a New Project
- Launch PSoC Creator.
- Got to File ➤ Open Project ➤ Project/Workspace.
- Open the PSoC5LP workspace in the EE4450 folder.
- After PSoC Creator opens the workspace, right-click on Workspace 'PSoC5LP' in the Workspace Explorer and select Add ➤ New Project...
- Select the correct PSoC5LP device model number, use the "Empty schematic" template, and enter the project name 04_Thermometer.
Adding PSoC Creator Components
Follow these detailed steps to add components to the PSoC Creator project by modifying the TopDesign.cysch schematic file:
- Add a Character LCD component:
- Navigate to the Display catalog in the component selection panel.
- Drag and drop the
 Character LCD onto the schematic.
- Add a SAR ADC component:
- Navigate to the Analog ➤ ADC catalog in the component selection panel.
- Drag and drop the SAR ADC onto the schematic.
- Add an Opamp component:
- Navigate to the Analog ➤ Amplifiers catalog in the component selection panel.
- Drag and drop the
 Opamp onto the schematic.
- Add an Analog Pin:
- Navigate to the Ports and Pin catalog in the component selection panel.
- Drag and drop the Analog Pin onto the schematic.
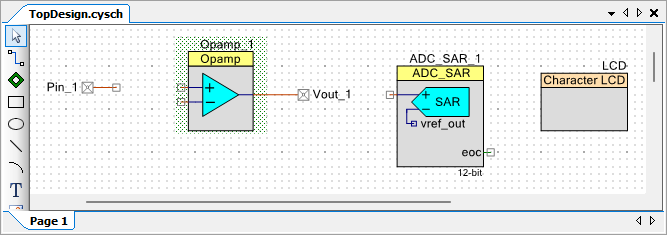
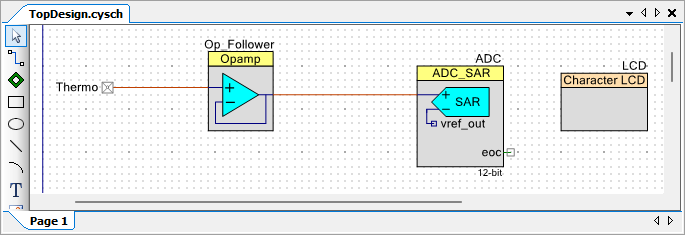
The TopDesign schematic is shown below:
Configure the Components
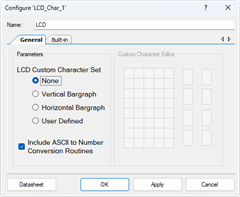
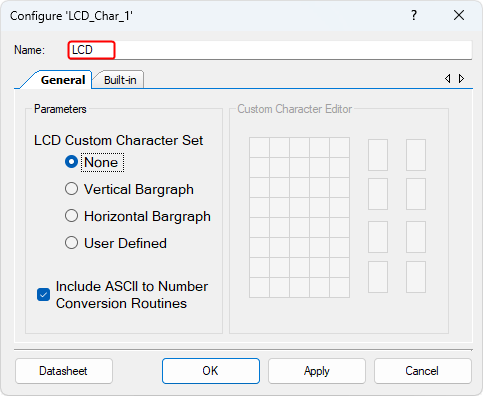
- Config the Character LCD (LCD_Char_1):
- Click on the LCD_Char_1 component in the schematic.
- Rename the component to LCD for clarity and ease of identification.
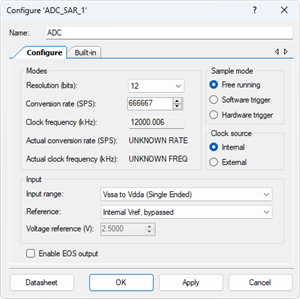
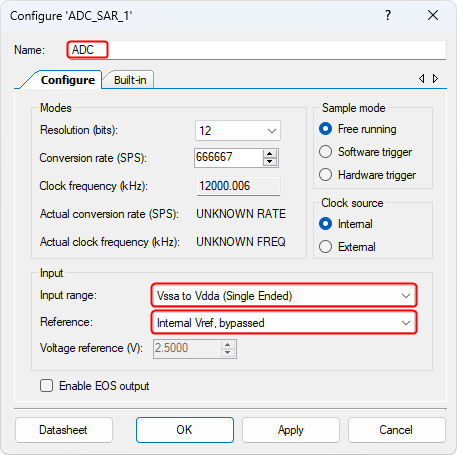
- Config the SAR ADC (ADC_SAR_1):
- Click on the ADC_SAR_1 component in the schematic.
- Rename the components to ADC for ease of identification.
- Set the Input range to Vssa to Vdda (Single Ended) to specify the voltage range from ground (Vssa) to the system supply voltage (Vdda).
- Set the Reference to Internal Vref, bypassed, which allows for an internally generated voltage reference with bypass functionality. This helps ensure stable reference voltage for accurate ADC conversions.
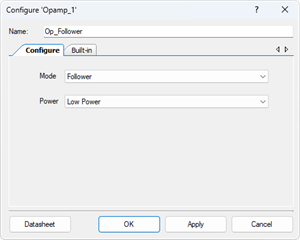
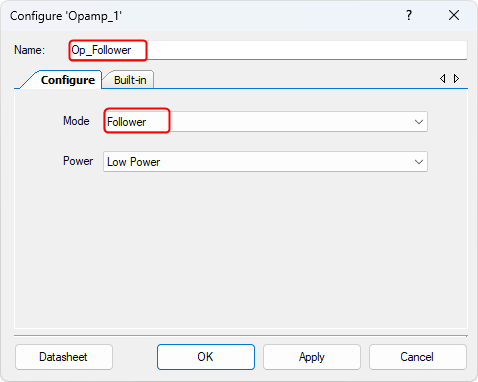
- Config the Opamp (Opamp_1)
- Click on the Opamp_1 component in the schematic.
- Set the Mode to Follower (Voltage Follower), ensuring that the Opamp buffers the signal without amplification, which is typically used for impedance matching.
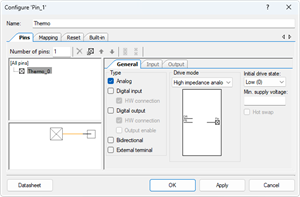
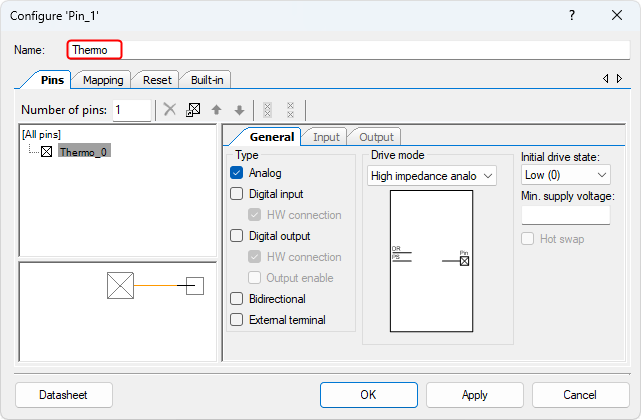
- Config the Analog Pin (Pin_1):
- Click on the Pin_1 component in the schematic.
- Rename the components to Thermo to represent its connection to the thermistor or temperature-sensing device, making it easy to identify in the project.
Wiring
- Delete Vout_1 component to remove the existing connection and free up the output for further wiring.
- After removing the Vout_1 component, connect a wire from the output of the Op_Follower (Opamp) component to the input of the ADC component. This ensures that the signal processed by the Op_Follower is properly fed into the ADC for conversion and measurement.
- Connect the Thermo pin (analog input) to the input of the Op_Follower component. This setup allows the temperature sensor (connected to the Thermo pin) to send its signal to the Op_Follower for buffering and stabilization before passing it to the ADC for conversion.
Following these instructions, the signal flow will proceed from the temperature sensor (Thermo) to the Op_Follower for buffering and then to the ADC for accurate analog-to-digital conversion.
Pin Assignment
| Device | Port.Pin | Direction | Drive Mode |
|---|---|---|---|
Template Firmware Code
main.c
#include "project.h"
#include <stdio.h>
#include <stdlib.h>
#include <stdint.h>
#include <stdbool.h>
#include <string.h>

int main(void)
{
    double           tempK, tempC, tempF;
    unsigned int     adc;
    char             str[50];

    CyGlobalIntEnable; /* Enable global interrupts. */

    /* Place your initialization/startup code here (e.g. MyInst_Start()) */
    Op_Follower_Start();
    ADC_Start();

    LCD_Start();
    LCD_ClearDisplay();
    LCD_Position(0,0);
    LCD_PrintString("EE4450 PSoC5LP");
    LCD_Position(1,0);
    LCD_PrintString("NTC Thermometer");
    CyDelay(2000);              // Delay for 2 second

    for(;;) {
        /* Place your application code here. */

        CyDelay(500);   // Delay for 500 ms
    }
}
/* [] END OF FILE */
Exercises
Exp #01: Measure the room temperature in Celsius and Fahrenheit units
In this exercise, we will design a simple thermometer application using the PSoC5LP. The system will measure an analog signal through the ADC (Analog-to-Digital Converter), convert it into digital form, and then calculate the temperature values in Kelvin, Celsius, and Fahrenheit. Finally, the results will be displayed on the character LCD screen, allowing real-time observation of temperature changes.
Procedures:
- Enable ADC Conversion
- Start the ADC component to begin the conversion process by using ADC_StartConvert().
- Check Conversion Completion
- Use the function ADC_IsEndConversion(ADC_WAIT_FOR_RESULT) to ensure the program waits until the ADC conversion is finished.
- This guarantees that only valid ADC results are used for temperature calculations.
- Calculate Temperature Values
- Convert the ADC result into corresponding temperature values:
- tempK (Kelvin)
- tempC (Celsius)
- tempF (Fahrenheit)
- Convert the ADC result into corresponding temperature values:
- Display Results on LCD
- Output the calculated values to the character LCD so that the user can view the real-time measurements.
Formula:
- $temp{K_1} = \log \left( {10000.0 \times ({{{2^n}} \over {ADC}} - 1)} \right)$
- $tempK = {1 \over {0.001129148 + (0.000234125 + (0.0000000876741 \times temp{K_1}^2)) \times temp{K_1}}}$
- $tempC = tempK - 273.15$
- $tempF = tempC \times {{9.0} \over {5.0}} + 32.0$
Results:
After running the program, the LCD screen will display the measured temperature in Kelvin, Celsius, and Fahrenheit. The results confirm that the ADC conversion, calculation process, and LCD display are functioning correctly, forming the basis of a digital thermometer system.
